Stuffed Bell Peppers

Our favorite spin on this old standard:

Not the typical floating-in-tomato-sauce version.  That’s not bad… this is better 🙂

  • 4 red or yellow bell peppers.  Green if you like but they are just unripe colored peppers and can be bitter.
  • 1/2 cup of uncooked rice.  White or brown.  We’ve used white so far.
  • 2 carrots peeled and chopped.
  • 1 onion minced.
  • 2-6 garlic cloves minced.
  • 1 tsp chili powder.
  • 1/2 lb lean ground beef.
  • 2 tomatoes cored and chopped – seeded if you must…
  • 1/4 cup chicken broth.
  • 1 cup shredded cheddar cheese.
  • 1 tbsp lemon juice.
  • 1 seeded and minced jalapeno – for flavor, not heat. Optional.
  • Some might add 1 tbsp of tomato paste and 2 tbsp of minced parsley.  We don’t.

It helps if the peppers, onion, carrots, jalapeno, tomatoes, and garlic come straight from your garden.  If not, make do @ the super 😉

Trim the tops off the peppers, seed and core.  Submerge in boiling salted (1 tbsp or so) water to cover and cook until they just start to soften.  Maybe 5 minutes.  Remove, drain, and let cool.

Bring the water to a boil again, add rice, cook until tender, drain and transfer to your working bowl.

Saute the carrots, onion, and jalapeno (if using) in olive oil until they start to soften.  Add garlic, tomato paste (if using), and chili power and cook another 30 seconds or so.  Don’t scorch the garlic.

Add the ground beef and cook while breaking it up until all is just browned through.  Add tomatoes and chicken broth and cook until the tomatoes start to break down.

Add the beef mixture to the rice in your working bowl along with the chicken broth, lemon juice, parsley (if using), 3/4 cup of the cheese, salt and pepper to taste.  Mix thoroughly.

Dry the inside of the peppers, fill with the mixture, top with the rest of the cheese, and place in a suitably-sized baking dish (so they don’t fall over…).  Bake in a pre-heated 350F oven until heated through.  30 minutes or so.

Enjoy 🙂

Posted in Food & Garden, Uncategorized | Leave a comment

Stinky Spuds

One of my favorites, especially now when the garden provides potatoes, onions, and peppers.  Goes great with grilled chicken, ribs, whatever floats your boat.

I’ll skip the measurements…

Spuds – chopped/diced/sliced per your whim – raw fried in olive oil.

When they’re ~ 5 minutes from done toss in chopped/diced/sliced sweet bell pepper and chopped/diced/sliced onion and turn the heat down a little.

I sometimes add garlic but be careful – it can scorch.  The other day I did include some jalapeno with the bell pepper for a little added interest.  Delish 🙂

A minute or so from done I like to sprinkle in some cumin and paprika.

Once it hits my plate I usually top with grated Parmesan cheese and salt + pepper.

[edit to add] Make a one-skillet meal out of it:  add chopped spinach, cabbage, or kale then with the heat turned down make pockets and (gently) crack some eggs into them.  (There’s no rule that says it couldn’t involve some bacon or sausage 😉 )

Enjoy 🙂

Posted in Food & Garden, Uncategorized | Leave a comment

Update ThinkPad BIOS with Bootable Flash Drive

This is the original draft of a KB article written for the Lenovo forums.  It may be old news, but I’ve only recently come across it.  There are likely other ways to do this using the ISO instead of the .exe – perhaps grub2 + loop-mounting, grub2 + memdisk, geteltorito – but this is the “official” Lenovo approach.

Full disclosure: I haven’t yet actually had occasion to build the flash drive and test the BIOS update process.

Traditionally, ThinkPad BIOS updates have been provided for download in two formats:  a Windows .exe installer, and an ISO that can be used to create a bootable CD.  The CD version was useful for those who aren’t running a Windows OS, or who have a damaged main drive or OS that won’t boot.

These days, an optical drive is becoming a rarity – requiring the use of an external drive.  Fortunately, with recent ThinkPad BIOS updates using a bootable flash drive has become an option.  The instructions and tools are included in the Windows .exe.  It’s necessary to run the 1st stage of the install to access them, so a Windows PC or virtual machine is required.

We’ll use a 1st generation X1 Yoga BIOS in this example.  Be sure to use a BIOS .exe that matches your laptop model, not the one in this example.

The first step is to download  the .exe for the BIOS installer desired.  Start with the Lenovo main support page https://support.lenovo.com/us/en enter your laptop model in the search box, select the appropriate model from the list offered, navigate the Drivers and Software link to the BIOS download.

The way the .exe is built it’s necessary to run the first stage of the install to be able to access the contained files.

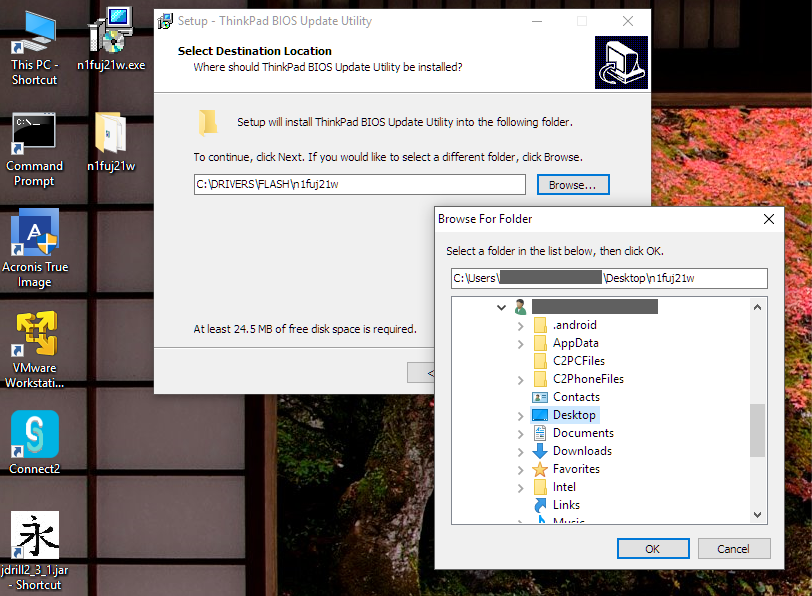
Locate the downloaded .exe and run it.  You’ll be offered a target folder and the option to browse for a target folder of your choosing.  Make a note of where the driver files are going and proceed.

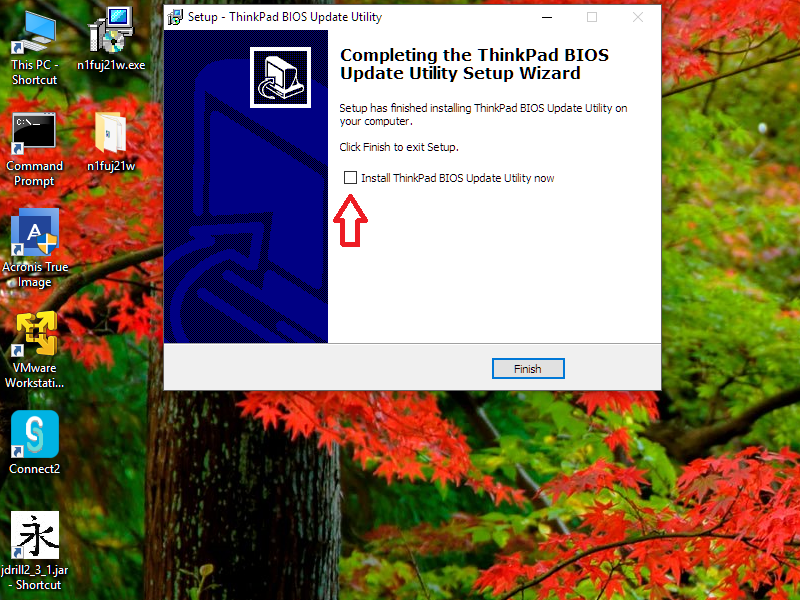
The next phase of the process will ask to actually install the BIOS on the current PC or virtual machine.  Don’t let it.  Un-check the “Install ThinkPad BIOS Update Utility Now” check box and click Finish.

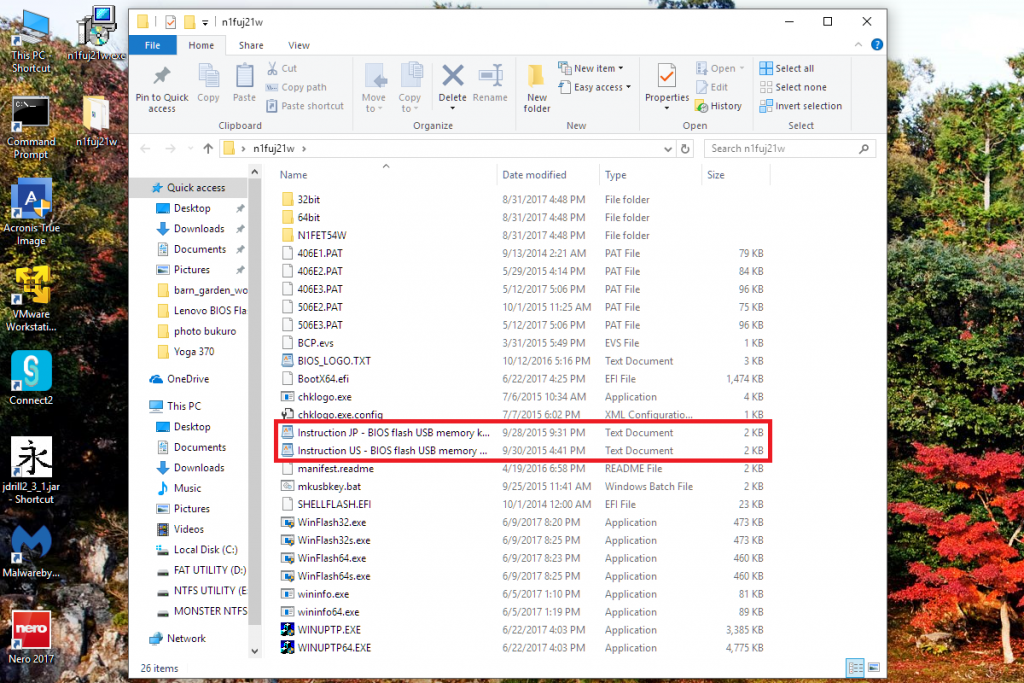
Now you can navigate to the installer files.  You should see something like the below.  Read and follow the instructions.

Posted in Uncategorized | 5 Comments

More ThinkPad Retro News…

Posted in Uncategorized | Leave a comment

Net Neutrality At Risk

Posted in Uncategorized | Leave a comment