Polenta With Chicken And Wild Mushrooms

Chanterelle_Cantharellus_cibariusChanterelle

It’s chanterelle mushroom season in the Pacific Northwest.  They grow wild here and are starting to show up in the market.  They’re mild-flavored and I never thought much of them until SWMBO came up with this excellent recipe.  The subtle smoky mushroom flavor goes very well with the polenta and chicken, and the feta adds a nice counterpoint.

Bake approximately one pound of chicken breast (two individual breasts) with a sprinkling of black pepper, oregano, and basil.  Cool and shred.

Chop a small onion and two cloves of garlic.  Saute in olive oil and 1 TBSP of butter until softened.  Cut 5-7 chanterelle mushrooms (more or less, to taste) into chunks and add to the onion and garlic.  Continue to saute until the mushrooms begin to wilt.  Sprinkle with a little cayenne pepper.  Add the shredded chicken.

Bring 3 cups of chicken broth to a low boil.  Add 1 cup of polenta (quick-cooking polenta if you can find it) in a small steady stream.  Cook until thickened.  Stir in 1/4 cup of Parmesan cheese when done.

Combine the polenta, chicken mixture, and 1/4 cup of feta cheese.  Mix well and transfer to a casserole dish.  Bake at 350F for 15-20 minutes.

Now all you need is some warm French bread and a glass of good pinot noir.

Enjoy!

1 lb chicken breast (more or less)
1 cup polenta (quick-cooking if available)
5-7 chanterelle mushrooms (more or less)
1 small onion
2 cloves garlic
3 cups chicken broth
1/4 cup grated parmesan cheese
1/4 cup feta
1 TBSP butter
olive oil as needed
black pepper, oregano, basil, cayenne pepper to taste
Posted in Food & Garden, Uncategorized | Leave a comment

Salt Water Mooring: don’t believe everything you read in Chapman

15 years ago – or so – we had the good fortune to acquire waterfront property with a boat ramp.  All it needed was a mooring to make things complete.  Out came the copy of Chapman, and I built a mooring per the conventional wisdom.  Something like this:

MooringCropped
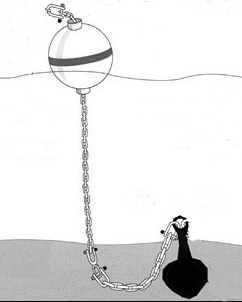
The anchor was a massive concrete hemisphere with an iron ring.  The guy who delivered it on-site had attached a 6 foot log boom chain with a 1-1/2 inch shackle.  I added a 3/4 inch swivel and 25 feet of 1/2 inch long-link chain.  A 24 inch float with the chain passing through the middle, and a 5 foot pennant completed the setup.

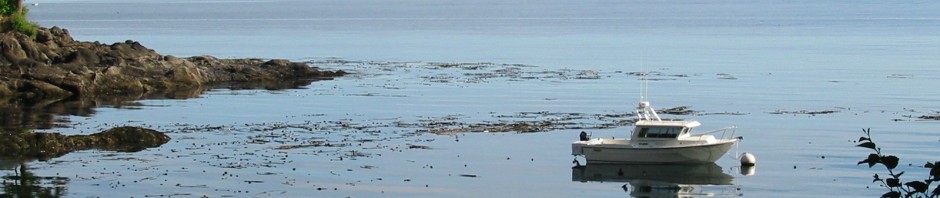
Just like the image above, and hell-for-stout.  Not so much.  It didn’t survive the first winter.  The lower portion of the lighter chain was almost completely gone, and one of the swivel shackles had failed.  The real excitement: the weight of chain kept the float in more-or-less the same place I had set it.  I tied up my 21-footer, took the trailer off the truck, and built a camp fire.  A little later noticed that the boat was gone!  It had drifted almost onto the rocks by the time I got organized and retrieved it.  Needless to say, that was it for the fishing weekend.

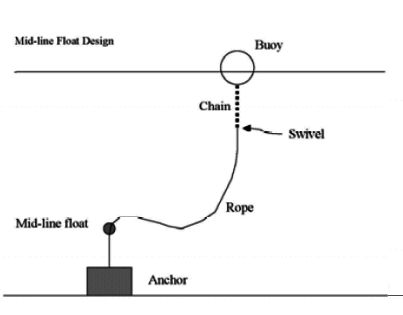
Here’s the deal:  it isn’t the big waves, weight of the boat, passing logs, kelp, and other junk that tears up the mooring.  It’s the constant little riffles.  Whatever chain link is just at the bottom (where chain goes from lying flat to vertical) gets its galvanizing rubbed off.  It rusts, and the rust gets rubbed off.  The length of chain that’s subject to this (given the tidal range) dissolves pretty quickly.

My solution (modified from a set-up a local diver described to me) is to use nylon rope instead of chain, and try to minimize motion in the places where metal must be used.  That and use the heaviest parts available.  The rope does the wiggling, and hopefully reduces the scuffing action on the metal.

The setup, from the bottom up:  anchor, 1-1/2 safety shackle (heavy enough to just lie flat most of the time so it doesn’t wear the anchor ring), 1 inch shackle (more or less vertical so it doesn’t wiggle much), 3/4 inch swivel (stands vertical),  3/4 inch shackle, 20 feet of 3/4 inch 3-strand nylon with 3/4 inch wire rope thimbles at each end, a mid-water float (trawl ball or similar to hold the swivel vertical and isolate the lower parts from the riffles) 6 feet from the bottom of the rope, 5/8 inch shackle, 7 feet of 1/2 inch long link chain through the float (the chain weight snubs some of the yank on the other parts), 24 inch float, 5/8 inch shackle, galvanized ring (for convenience), and a 5 foot pennant with stainless snap.

I replace all the metal and nylon every three years – with the exception of the 1-1/2 inch safety shackle, which seems to last 15 years, more or less.  One could argue that the swivel should be at the top of the rope so the bottom shackle could stand vertical.  This might be a better setup, but I’m worried about wearing out the anchor ring.  Once that’s gone, it’s game over.

The “upper swivel” setup would look something like this:

mid_float_mooring_croppedjpgThe original sketch:

Moorage

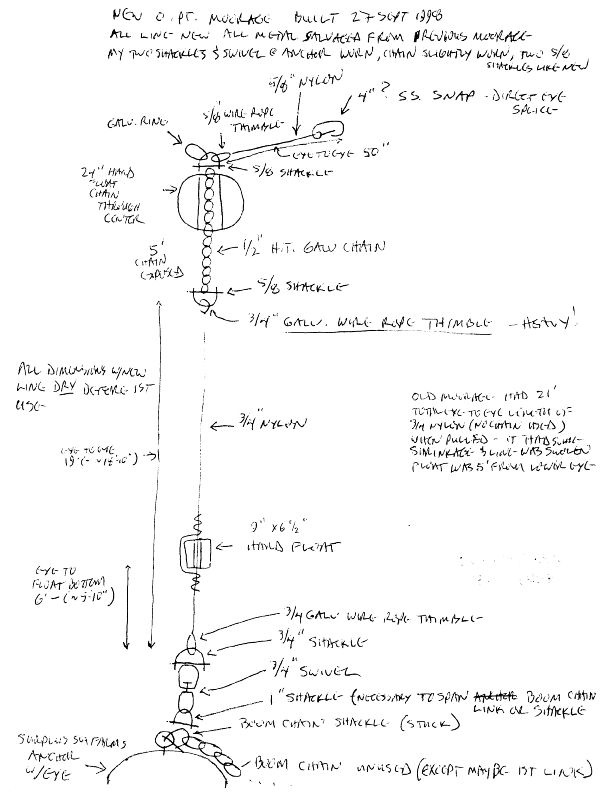
And what the 2016 version looks like:

Mooring_RESIZED

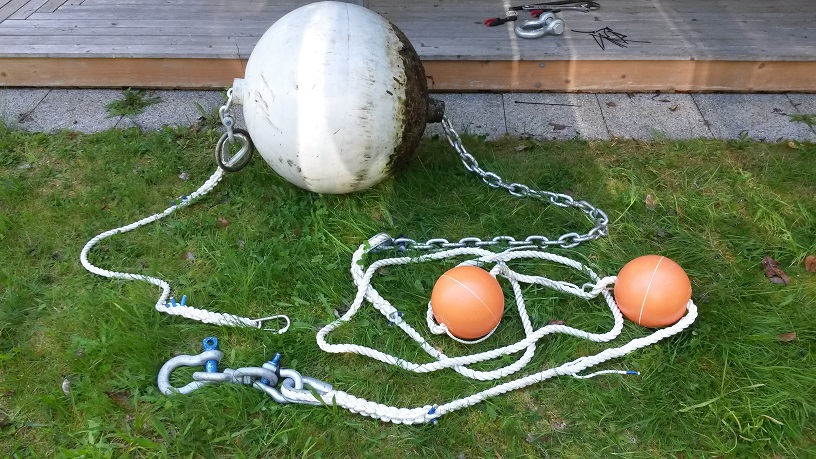
A cleaned up schematic:

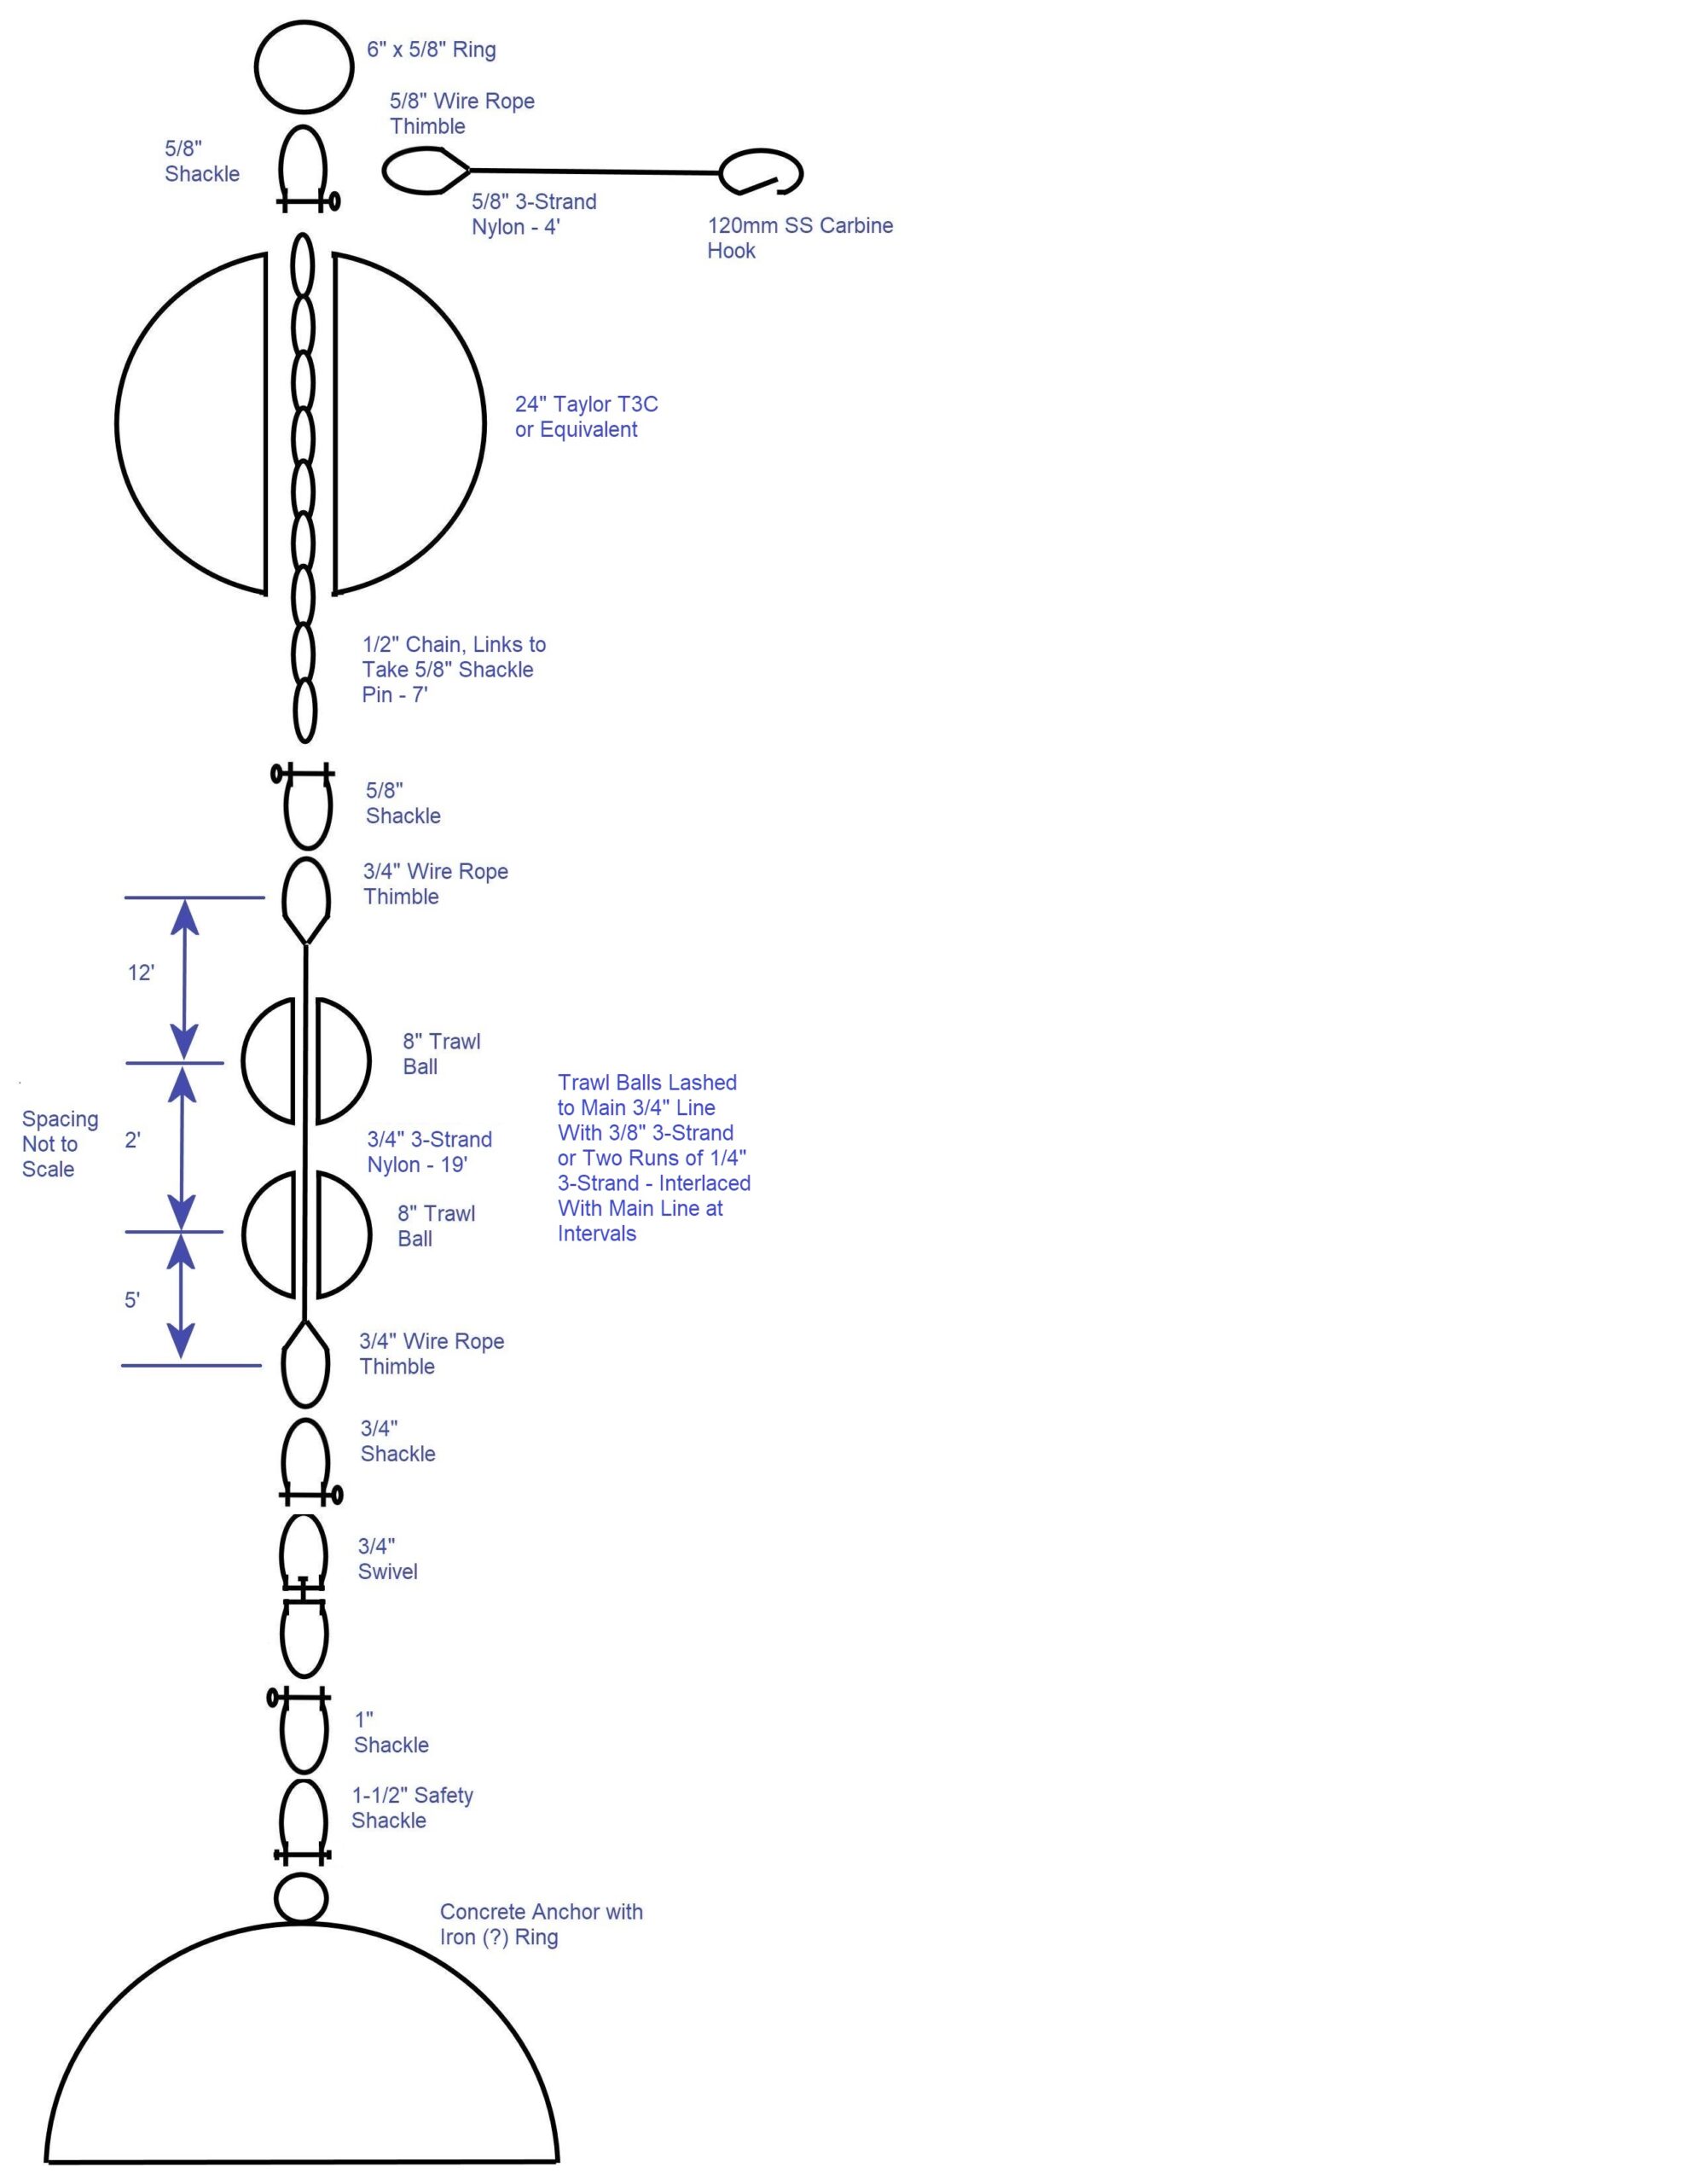
Mooring ReDraw 2020.05

Posted in Boating, Uncategorized | Leave a comment

Coleslaw, a lot of coleslaw…

A big cabbage split open in the garden today. Sort of a slaw grenade.  Only one thing to do when life hands you lemons cabbage: make coleslaw…

Shrimpy Slaw:

  • Chopped cabbage
  • Salad shrimp
  • mayo
  • splash of tarragon vinegar
  • a little diced shallot or green onion (I prefer onion, SWMBO likes shallot)
  • celery seed
  • black pepper
  • pinch of salt

Proportions per your taste.  Make a little in advance – maybe a couple of hours – and refrigerate.  It’s pretty good the next day, but breaks down after that.

DSC01637_RESIZED


Posted in Food & Garden, Uncategorized | Leave a comment

Small Girl, Big ‘But

Well, not that big…

I’m going to allow myself one grade-school halibut joke. *snicker*

It won’t happen again.

SmallGirlBigBut

Posted in Boating, Uncategorized | Leave a comment

Android and the Amateur: a n00b’s first look at Android development with the Yoga Tab 8

This is a draft of an article I wrote for “Community Spotlight” over at the Lenovo forums: In the Spotlight: App attack: Zoltanthegypsy’s first Android app.

I recently had my first taste of Android development.  With no prior Android experience – as either a user or developer – it was pretty interesting.  The occasion was porting a toy tcl/tk application that was running in Windows, Linux, and  Apple’s OS over to the Android environment.  More about that later.  Much later…

The tablet:

First, thanks to Lenovo for providing the Yoga Tablet 8 for this exercise.  I’m a old-school keyboard and TrackPoint using command-line c coder, so I was a pleasantly surprised by the little tablet’s capabilities.  The touchscreen is very readable and usable and the “kickstand” is a nice feature.  It’s handy to have the YT8 propped up and visible while using an external keyboard or poking at it from an attached PC.

Battery life is ridiculous.  In all my playing with it, I haven’t needed to recharge yet.  I can’t give you specific numbers but in my use case it looks to be at least 10+ hours.  Nice.

Another very useful feature is the OTG (on-the-go) micro USB port.  The provided standard micro USB cable works for charging or attaching to a PC for file transfer.  With an OTG adapter plugged in, the tablet becomes a USB host.  The OTG adapter provides a female USB connector that can be used to attach a keyboard (nice for development work) or things like my USB flash nunchucks (pictured below) for file backup and off-line transfer.

Bluetooth is also available.  The Lenovo compact USB and Bluetooth keyboards worked very well with the YT8.

YT8_and_USB_kbd_RESIZED

YT8_and_bluetooth_kbd_RESIZED

YT8_and_flash_drives_RESIZED

Added apps:

A pair of apps were immediate necessities.  I’m comfortable working from the Linux command line (a Linux kernel is at the heart of the Android environment – mostly invisible to the user) so I needed a terminal emulator.  Off to the Google Play Store and grab Android Terminal Emulator.  It was obvious very quickly that the stock on-screen keyboard was going to be a challenge.  Arrow keys to recall and modify previous command line entries are close to mandatory.  Back to the Play Store and add Hacker’s Keyboard.  There are some really excellent free apps available via the Play store.  Who knew?

Hackers_keyboard_RESIZED

Now it’s easy to navigate the internals of the system – hunting down file paths and manipulating things not easily accessible via the stock file browser.  I’ll admit that it was often even easier yet to attach the YT8 to my desktop PC and just use Windows Explorer (yeah, I’m running Win 7 on the desktop) to navigate the tablet’s filesystem.  The tablet shows up as an attached storage device in explorer.

YogaTab8inExplorer

Development guides and tools:

To the bookstore… some browsing and guesswork led me to Ed Burnette’s Hello Android.  For me – the totally clueless – it was a good place to start.  Looks like development is usually done with an Android emulator running on a host machine.  Faster is better. See below.

The book said to install Java (the development kit, not just the runtime), an IDE, and the Android SDK. Things change fast in this realm so it was a little easier than that.  The JDK SE 7 development kit comes from Oracle.  Everything else can be found at the Android developer site.  The Android SDK now includes the Eclipse IDE, so that’s a plus.

First impression of the Android emulator:  slow.  Really, really slow.  Unusably slow.  This can be greatly improved by installing the Intel Hardware Accelerated Execution Manager (HAXM) and an x86 Atom System Image.  These allow taking advantage of the host computer’s hardware virtualization.  Thanks to this article:  Slow Android emulator.

I wanted to add the Terminal Emulator and Hacker’s keyboard to the emulator.  Another thing that you real developers already know: in order for the emulation to install apps from the Google Play Store, it’s necessary to link the emulation to a Google account.  To do that, the Google APIs must be added to the Android emulation.  Use the SDK manager in the Android IDE.  Another way to do this is to browse to the app in the store and then follow the link to the individual app’s author’s site.  There’s usually a download link there.

T420_Eclipse_Android

The project.  At last:

This began with a desire to try some GUI programming.  In my professional life I design hardware and write Linux and Solaris device drivers and test code.  Command line stuff.  vi and BASH.  No GUI experience at all.

My little toy GUI project was a Sudoku solver written tcl/tk using Active’s free community edition multi-platform tcl.  It doesn’t do anything useful but was a good learning experience.  For fun it will try to solve (but not generate) Sudoku puzzles in Arabic numerals (123…) or Kanji (四, 五, 六).

sudoku_kanji

Problem is, that’s tcl/tk.  Android requires Java.  Yike.  The conversion could take forever since I don’t know Java.  Lenovo’s Android developer forum and AndroWish to the rescue…

AndroWish:

The Lenovo forums have recently added the Lenovo Developer Community, including Android Ecosystem Developers.  I posted a n00b’s request for guidance there: [Android n00b] how to begin?  No idea how such a basic request would be received.

I got an almost immediate reply from Christian Werner, the author and maintainer of AndroWish.  This is a wonderful project that’s brought tcl/tk to Android.  With his encouragement – he even caught a typo in my code that had been lurking there all along – I quickly had my little toy program running in the Android emulator and on the Yoga Tab 8.  Maybe I can put off learning Java for another year or two 🙂

At this time it’s necessary to launch my little program from AndroWish’s command line.  The next phase of the project will be to convert it into an actual Android app.  Christian has provided tools and a how to:  HelloTclTk.

Many thanks to Christian Werner for his help, to the nice people at the comp.lang.tcl newsgroup for getting me going in the fist place, and to Lenovo for providing the Yoga Tab 8 – and a place to post and share.

Z.

..oh, almost forgot…

T420_and_YT8_RESIZED

Posted in Uncategorized | Leave a comment