Windows 10 USB Install Media … or MS BS

I got schooled (again) the other day whilst trying to help a forum member.  They’d been running Linux on a Lenovo machine and wanted to boot Windows 10 install media to set up a dual boot situation.

Forum Member: “I’ve made a flash drive with the Windows 10 20H2 ISO but it refuses to boot.”

Mr. Know-it-all: “Did you extract the contents of the ISO to a FAT32-formatted flash drive?”

Forum Member: “Tried multiple techniques for extraction and they don’t boot.  Some try but fail.  And no way to use FAT32.  One of the files in the ISO is too large.”

Mr. Know-it-all: “Huh?  I’ve done that many times – 7zip or Windows Explorer to do the extraction.  No prob.  Just tested it again with 20H2.  Even copied the ISO to Fedora Linux and used Linux tools.  How about a screen shot?”

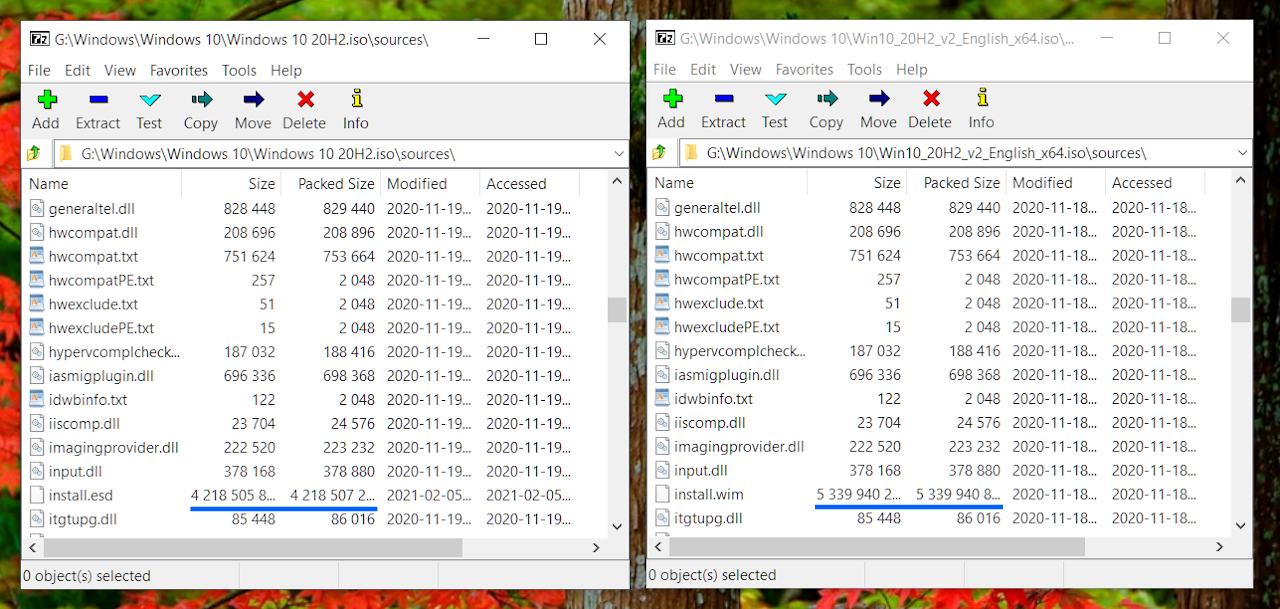
Sure enough, /sources/install.wim is too large for FAT32.  But WTF, I’ve never run into this.

Hmmm… apparently the ISOs I’ve used have all been built by Microsoft’s media builder.  It creates an ISO using an ESD file – which per the interwebs is more compressed than a WIM file and can reduce the size by ~30%.  There may also be some editing to the contents during the creation process.  Don’t know.

How did the forum member end up with an ISO with a WIM file?  Aha… If one does the download from the MS site while running Windows, it only offers the creation tool.  If running the download from Linux, for instance, it only offers the ISO – and only the version with the over-large WIM file.

Windows 10 20H2 ISOs

Bleeping brilliant. Not.  Why in the world is MS offering an ISO that can’t be used directly to build a FAT32 install drive?  After all, FAT32 is the format common to all UEFI BIOSen when it comes to booting.  Support is required per the spec.  Some PCs may be able to boot UEFI from an NTFS drive, but not Lenovo PCs.

Also per the interwebs, there are ways to split the WIM file using Windows or Linux tools – I’ve not tested either of the ones linked below –  but good grief.  Why make this necessary in the first place?

Windows:  https://www.zdnet.com/article/windows-10-installer-files-too-big-for-usb-flash-drive-heres-the-fix/

Linux:  https://wimlib.net/

Might be easier to just run the MS media creation tool in Windows in the first place.  In a virtual machine, perhaps.  Absurd that any of this is necessary 🙁

[Update 2021.10.08] Things are a bit different with Windows 11 – and yet not… Currently when accessed from a Windows machine the Window 11 download page offers an ISO along with the creation tool option.  That ISO is multi-version and has a .wim file too large for FAT32.  To quote from the page:

“This option is for users that want to create a bootable installation media (USB flash drive, DVD) or create a virtual machine (.ISO file) to install Windows 11. This download is a multi-edition ISO which uses your product key to unlock the correct edition.”

They don’t say how one would make a usable USB flash drive, since some brands (ThinkPads) will only boot FAT32 flash drives when in UEFI mode, and the file won’t fit.  Hmmm….

[Update 2021.10.13] Discovered a a way to deal with it using GUI tools in Windows:  Windows 10/11 ISO: install.wim too large for FAT32

Posted in Uncategorized | Leave a comment

ThinkPad P1 Gen 2: a Beauty AND a Beast

ThinkPad P1 Gen 2 – images Lenovo

A beauty: slim and trim, carbon fiber display cover, gorgeous UHD OLED touch display.

A beast: hexacore i7, two NVMe SSD slots, major league RAM capacity.

This beastly beauty is my first workstation-class ThinkPad, my first 15 inch machine, and my first OLED display.  It came to me from Lenovo via NateS, an exceptionally generous Lenovo Forum SuperMod.The write-up is a little late – the Gen 3 is already available – but let’s have a look anyway.  Here’s the  usual list of things that I find interesting, a few fixes, and a couple of issues.  But first (and again):

From time to time  Lenovo sends me a gadget. They’re handy to have around – both for my own use and when trying to help out in the Lenovo forums. I do some testing and writing as well. Beyond the use of the laptop, I’m not otherwise compensated. Professional images are Lenovo’s.  Amateur snapshots are mine*.  Opinions are exclusively mine.  I do not work for, represent, or speak for Lenovo.

*  And worse than usual.  I hadn’t realized that a software update had turned off image correction in my phone.  Too late to redo some of them 🙁

There’s probably more low-level detail here than the typical workstation-class laptop user wants or needs, but if you’ll indulge me, read on… as always, double-check anything I say here before using it to make a purchase decision.

Continue reading

Posted in Uncategorized | Leave a comment

Fob Story III, A Tale of Three Fobs, Goldilocks and the … oh never mind…

Another chapter in the “Swiss Army” external drive saga. First it was the classic multi-boot USB flash drive:  A FOB STORY: some notes on bootable flash drives then the “turbo” external NVMe/USB-A & -C version: FOB Story II and now a dual USB-A/USB-C flash drive.  A tiny one.

I’ve had my eye on dual-connector flash drives for a while.  This one caught my attention – a SanDisk 256GB unit that was very inexpensive.  It’s ridiculously tiny considering its capacity.  High-capacity flash drives have had limited utility for my applications since Windows would only recognize a single partition.  If they were to be UEFI-bootable that had to be FAT32, but that limited maximum file size and was difficult to format with Windows tools.

That’s changed with Windows 10 1703.  We can now create and access multiple partitions, so like the Turbo NVMe drive (which appears as a hard drive and wasn’t limited by Windows) we can have a FAT32 boot and tool partition and a large NTFS partition for data and things like backup images.  The dinky drive is set up like the NVMe drive described in FOB Story II –  a 30GB FAT32 partition containing a live Linux + tools, and the rest NTFS.

NOTE: it’s still necessary  to use diskpart to set the FAT32 partition active to allow legacy booting.

Below are images of the drives and their Crystal DiskMark speed reports.  The tiny SanDisk isn’t fast, but it’s actually a bit faster than my trusty ADATA for sequential reads.

Three Swiss Army Drives

Crystal DiskMark Three Drives: ADATA, M2X/P1 NVMe, SanDisk


Posted in Uncategorized | 1 Comment

X1 Generations – ThinkPad X1 Yoga Gen 5

ThinkPad X1 Yoga Gen 5 – Exploded – image Lenovo


ThinkPad X1 Yoga Gen 5 – 360 View – image Lenovo


Another non-review where we examine the usual suspects.  You know the drill:

From time to time  Lenovo sends me a gadget. They’re handy to have around – both for my own use and when trying to help out in the Lenovo forums. I do some testing and writing as well. Beyond the use of the laptop, I’m not otherwise compensated.

Professional images are Lenovo’s.  Amateur snapshots are mine.  Opinions are exclusively mine.  I do not work for, represent, or speak for Lenovo.

Well, my luck continues to hold.  A pre-customer-ship-level ThinkPad X1 Yoga Gen 5 showed up a couple of weeks ago.  As was the Gen 4 unit I took a look at recently – 2nd Look: ThinkPad X1 Yoga Gen 4 & 10th Gen i7 – it appears to be an evolution and enhancement of the previous model… and a nice one, at that.  Superficially almost identical to the Gen 4, but with a different set of CPU options, an upgraded wifi chip, and improved ergonomics – at least to my admittedly subjective first impression.

I have no reason to think that the X1YG5 on my bench is any different than the customer-ship units, but as always what I describe here is based on the unit in hand.  YMMV.

Continue reading

Posted in Uncategorized | Leave a comment

Fiddling with Fedora Live

I may be the only one interested in this kind of thing, but the Fedora on ThinkPads news got me looking into Fedora again… after a long hiatus… This isn’t ThinkPad specific, although my current test machines are X1 Yogas and my typical targets are ThinkPads.

The back-story: I almost never need or want a bare-metal install of *nix these days (heresy!!!!) since I’m no longer maintaining Linux or Solaris drivers, but I do use live distros a lot. The advantage to using live distro media – even if on an internal HDD or SSD – is that it can be accessed and manipulated from Windows if in a FAT32 partition. There’s that heresy again… I “install” it on a secondary drive, or use it as the base for a “Swiss Army” flash drive or more recently an external NVMe SSD. Grub.conf can be edited (from Linux or Windows) to boot all sorts of things: other OS-en ISOs, forensic tools, backup software, etc… Typically my secondary drive or external pocket drive will have Linux live – multiple distros and versions, Acronis, Memtest, EFI Shell, and so on…

So, to Fedora… or actually Ubuntu first. Ubuntu has been my go-to base distro for donkey’s years until recently. They broke persistence – which is nearly a must-have for live media, and once they fixed that they broke the ability to loop-mount and boot an ISO – absolutely vital for what I do. That broke in 19.10 and remains a problem in 20.04 🙁

Now to Fedora… thought I’d give it a try and see if its version of grub will boot ISOs. The problem: my usual method of “installing” into a FAT32 partition doesn’t work 🙁 Normally I just pull the contents out of an ISO – Ubuntu, other Linux, Windows installer… – and toss it at a FAT32 flash drive or SSD (or even HDD) and we’re good to EFI boot. Fedora 32 done this way pulls up the grub menu but after selection my TP Yogas lock up. I can force the X1YG1 off but the X1YG4 refuses to honor a long press on the power button! Have to use the emergency reset hole. Yike!

The Fedora media creation tool builds a bootable drive but it generates an isofs (?) filesystem and shrinks the drive to 2GB. This isn’t easily accessible or editable, and doesn’t allow me to add other tools to ISO-boot or chainload. No place to put recovered data if that’s what the drive is being used for.

TLDR: There is a work-around. The boot code is looking for a filesystem label. Only took half a day of head-banging and navy language…

I edited both grub.conf and BOOT.conf (don’t know which did the trick) and replaced the CDLABEL with something I could name the flash drive from within Windows. “FEDORA32” in this case. Was able to boot a FAT32 flash drive live and Fedora seems happy.

Lines that looked like

linuxefi /images/pxeboot/vmlinuz root=live:CDLABEL=Fedora-WS-Live-32-1-6 rd.live.image rd.live.check quiet

Now read

linuxefi /images/pxeboot/vmlinuz root=live:CDLABEL=FEDORA32 rd.live.image rd.live.check quiet

Haven’t gotten to actually testing ISO loop booting or much else. Posting this on the off chance it helps others give live Fedora try.

Posted in Uncategorized | Leave a comment