What and Why:
Who could forget the original – A FOB STORY: some notes on bootable flash drives – but it’s time for the sequel…
m.2 SSDs have gotten faster (NVMe) and less expensive, and there’s finally a usable m.2 NMVe to USB-C/USB-3.0 adapter. Just the combo for building a turbo version of the “Swiss Army” flash drive.
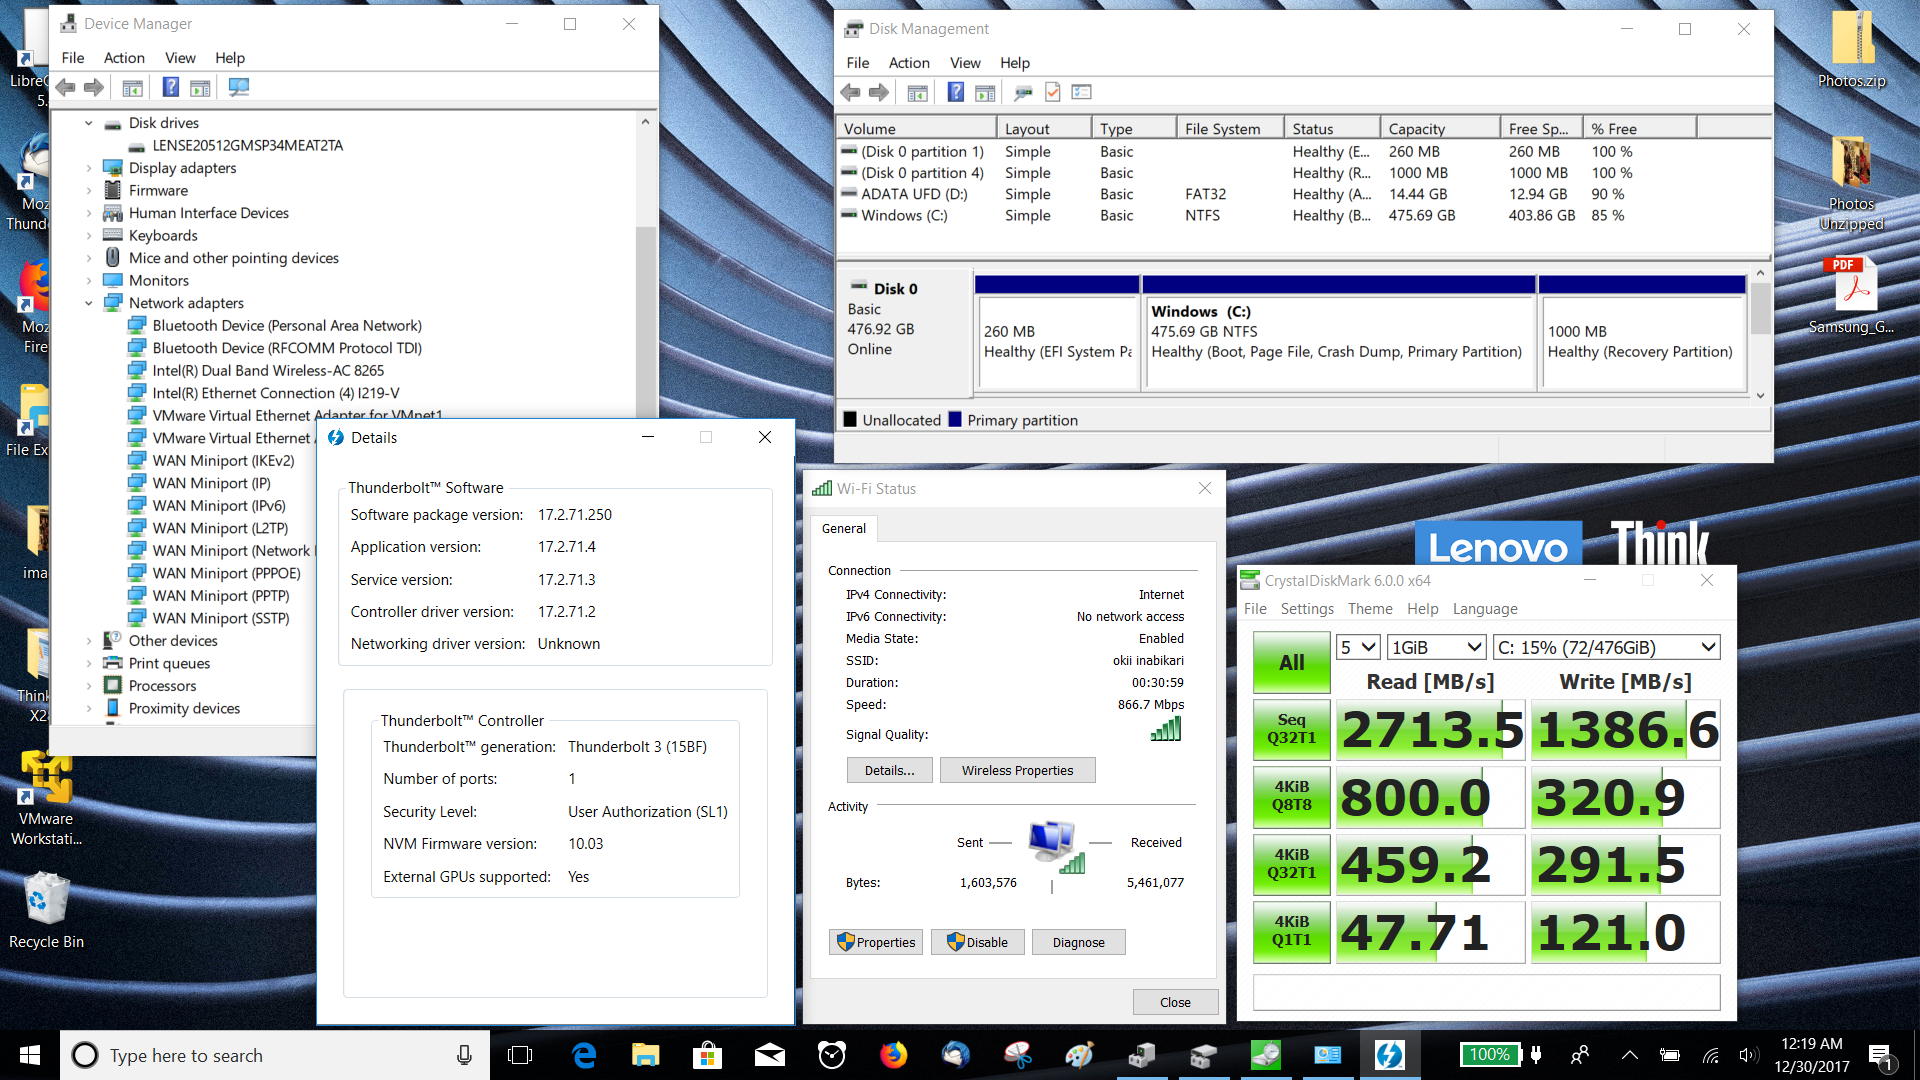
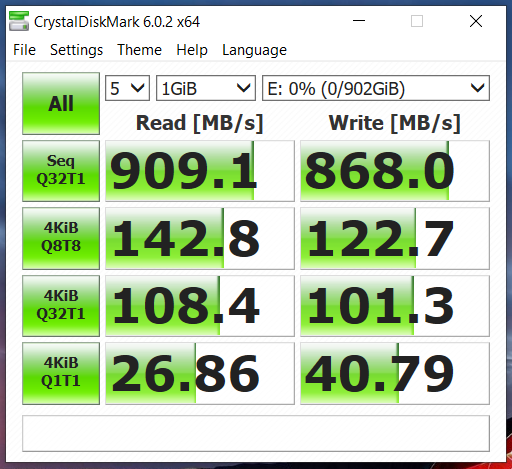
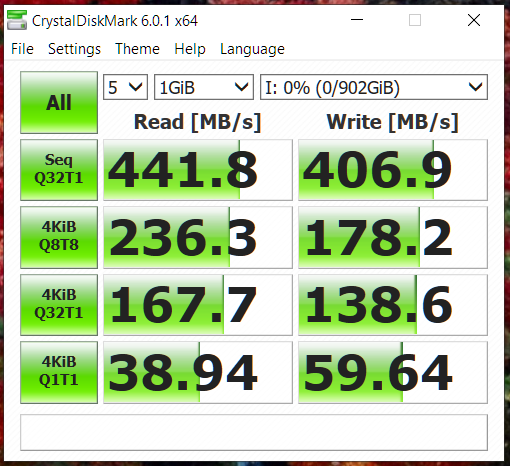
There are some real advantages to the above combo as compared to a flash drive implementation. First, of course, is speed. The setup that I configured hits close to 1GB/sec when on a USB-C port. A less-obvious advantage is the possibility of multiple partitions.
It’s been possible to configure multiple partitions on a flash drive with Linux, for instance, but Windows would only recognize the first partition. That really limits what one can do. (note: recent spins of Win 10 may tolerate multiple partitions. Looking into that…) With the SSD/adapter approach the external device appears as a removable hard drive, and Windows is happy with multiple partitions. I describe how I set up the partitions later in this article.
The Hardware:
There are multiple vendors making similar devices these days – certainly NVMe SSDs are available from several sources. There are also multiple adapter vendors – but not all are fully usable in my applications (see below). These are the ones I’m using:
The SSD: Crucial P1 1TB 3D NAND NVMe PCIe M.2 SSD – CT1000P1SSD8
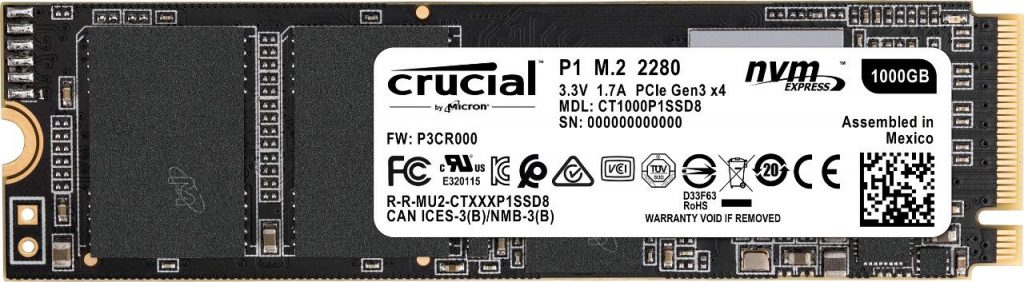
Picked for a couple of reasons: it’s well-priced, and fast. Not as fast as some more expensive 4-lane SSDs, but well matched with the adapter’s performance.
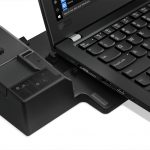
The adapter: MyDigitalSSD M2X Portable USB 3.1 Gen 2 M.2 PCI Express SSD External Enclosure Adapter w/USB-C USB-A Cables – MDNVME-M2X-USB
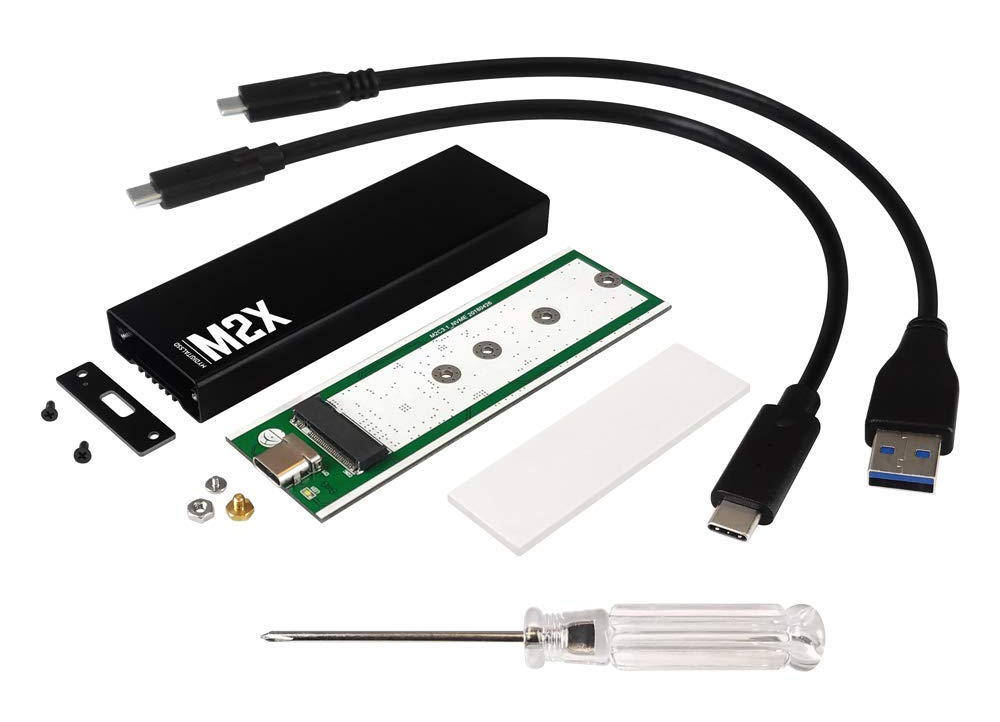
Picked for one very important reason (along with being very well priced…) it actually works in this application and others. Let me try to explain…
Earlier tries by other manufacturers would work with NVMe drives as external drives, but that was it. They required initializing an SSD to match their particular sector size requirements. That made them useless for forensics, recovery, cloning… anything that needed to preserve and access data already on the drive. Initializing nuked anything present.
This one can read and write SSDs pulled from my ThinkPads as well as implementing a general-purpose external drive. If you go with some other vendor’s adapter – be very careful to understand what you are getting.
How it’s configured:
There are myriad ways the SSD could be configured. I set things up pretty much as I have my multi-boot flash drives (details: A FOB STORY: some notes on bootable flash drives ) with the addition of an NTFS partition to hold data – typically Acronis backup images.
The first partition is FAT32 and contains a live Linux (Ubuntu 19.04) and other bootable tools: memtest, Acronis backup/recovery/ a UEFI shell tool, other Linux and Ubuntu versions. All (well, most) can be booted via stand-alone grub2 in both UEFI and Legacy mode.
I use a FAT32 partly as a hold-over from how flash drives got configured and because the contents can be edited/manipulated/added to from Windows and Linux. An installed Linux (an option since we can have multiple partitions) would be harder to manage from Windows. Since most of my PCs aren’t multi-boot these days but tend to run *nix in virtual machines, things are simpler to manage if Windows-accessible. All of this could also be done from Linux…
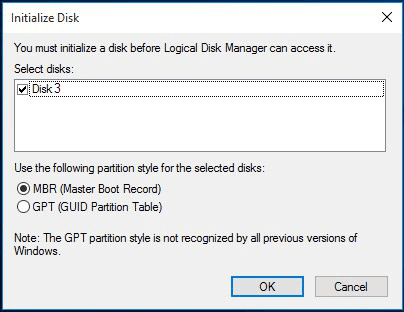
The SSD was initialized in MBR mode – not GPT – to allow for both UEFI and legacy booting.

It’s also necessary to set the FAT32 partition active to allow legacy booting in most BIOSen. For some reason Windows Disk Management didn’t allow that, so Diskpart was used. When using Diskpart for anything, be very careful to select the correct drive!
NOTE: click on lines that look like the below to expand their content. (Some browsers will always display the full content without clicking.)

Diskpart set active partition example
C:\WINDOWS\system32>diskpart

Microsoft DiskPart version 10.0.17763.1

Copyright (C) Microsoft Corporation.
On computer: ********

DISKPART> list disk

  Disk ###  Status         Size     Free     Dyn  Gpt
  --------  -------------  -------  -------  ---  ---
  Disk 0    Online          476 GB      0 B        *
  Disk 1    Online          465 GB  1024 KB        *
  Disk 2    Online         3726 GB      0 B        *
  Disk 3    Online          931 GB  1024 KB

DISKPART> select disk 3

Disk 3 is now the selected disk.

DISKPART> list partition

  Partition ###  Type              Size     Offset
  -------------  ----------------  -------  -------
  Partition 1    Primary             29 GB  1024 KB
  Partition 2    Primary            902 GB    29 GB

DISKPART> select partition 1

Partition 1 is now the selected partition.

DISKPART> active

DiskPart marked the current partition as active.

DISKPART> list partition

  Partition ###  Type              Size     Offset
  -------------  ----------------  -------  -------
* Partition 1    Primary             29 GB  1024 KB
  Partition 2    Primary            902 GB    29 GB

DISKPART> exit

Leaving DiskPart...

C:\WINDOWS\system32>
What’s on it:
For now there’s nothing in/on the NTFS partition. That will be used for (probably transient) data. All the current action in in the FAT32 partition.
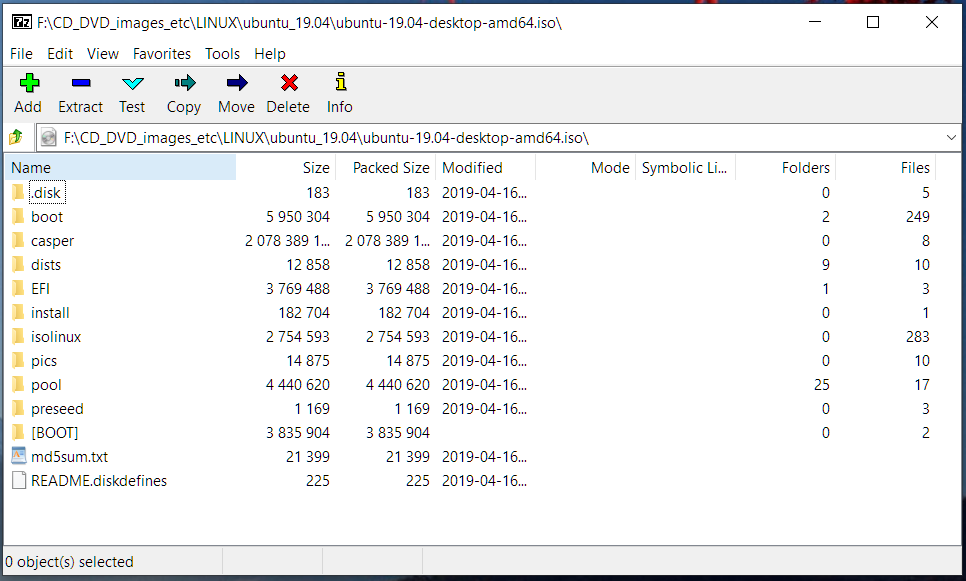
The build starts with Ubuntu 19.04 – live, not installed. That will be the primary bootable OS, and we’ll use its grub2 to handle booting other tools and OSen. getting a live, UEFI-bootable Ubuntu is as simple as downloading the ISO and copying its contents to the FAT32 partition. Don’t copy the ISO itself. Use 7zip, Windows 10 Explorer, or your favorite (un)archiving tool to extract the ISO contents to the SSD.
You should end up with this in the FAT32 partition (shown here in 7zip):
Adding the ability to boot in legacy mode involves installing grub2 to the boot sector. Boot the already-added Ubuntu in UEFI mode and run the installer. It will first be necessary to determine the device name of the booted M2x/SSD, and make its mount point (usually /cdrom) writable.
Determine device path and mount point
ubuntu@ubuntu:~$ mount
sysfs on /sys type sysfs (rw,nosuid,nodev,noexec,relatime)
proc on /proc type proc (rw,nosuid,nodev,noexec,relatime)
udev on /dev type devtmpfs (rw,nosuid,relatime,size=8009764k,nr_inodes=2002441,mode=755)
devpts on /dev/pts type devpts (rw,nosuid,noexec,relatime,gid=5,mode=620,ptmxmode=000)
tmpfs on /run type tmpfs (rw,nosuid,noexec,relatime,size=1606936k,mode=755)
/dev/sda1 on /cdrom type vfat (ro,noatime,fmask=0022,dmask=0022,codepage=437,iocharset=iso8859-1,shortname=mixed,errors=remount-ro)
/dev/loop0 on /rofs type squashfs (ro,noatime)
/cow on / type overlay (rw,relatime,lowerdir=//filesystem.squashfs,upperdir=/cow/upper,workdir=/cow/work)
securityfs on /sys/kernel/security type securityfs (rw,nosuid,nodev,noexec,relatime)
tmpfs on /dev/shm type tmpfs (rw,nosuid,nodev)
tmpfs on /run/lock type tmpfs (rw,nosuid,nodev,noexec,relatime,size=5120k)
tmpfs on /sys/fs/cgroup type tmpfs (ro,nosuid,nodev,noexec,mode=755)
cgroup2 on /sys/fs/cgroup/unified type cgroup2 (rw,nosuid,nodev,noexec,relatime,nsdelegate)
cgroup on /sys/fs/cgroup/systemd type cgroup (rw,nosuid,nodev,noexec,relatime,xattr,name=systemd)
pstore on /sys/fs/pstore type pstore (rw,nosuid,nodev,noexec,relatime)
efivarfs on /sys/firmware/efi/efivars type efivarfs (rw,nosuid,nodev,noexec,relatime)
bpf on /sys/fs/bpf type bpf (rw,nosuid,nodev,noexec,relatime,mode=700)
cgroup on /sys/fs/cgroup/net_cls,net_prio type cgroup (rw,nosuid,nodev,noexec,relatime,net_cls,net_prio)
cgroup on /sys/fs/cgroup/hugetlb type cgroup (rw,nosuid,nodev,noexec,relatime,hugetlb)
cgroup on /sys/fs/cgroup/devices type cgroup (rw,nosuid,nodev,noexec,relatime,devices)
cgroup on /sys/fs/cgroup/pids type cgroup (rw,nosuid,nodev,noexec,relatime,pids)
cgroup on /sys/fs/cgroup/rdma type cgroup (rw,nosuid,nodev,noexec,relatime,rdma)
cgroup on /sys/fs/cgroup/perf_event type cgroup (rw,nosuid,nodev,noexec,relatime,perf_event)
cgroup on /sys/fs/cgroup/memory type cgroup (rw,nosuid,nodev,noexec,relatime,memory)
cgroup on /sys/fs/cgroup/blkio type cgroup (rw,nosuid,nodev,noexec,relatime,blkio)
cgroup on /sys/fs/cgroup/freezer type cgroup (rw,nosuid,nodev,noexec,relatime,freezer)
cgroup on /sys/fs/cgroup/cpuset type cgroup (rw,nosuid,nodev,noexec,relatime,cpuset)
cgroup on /sys/fs/cgroup/cpu,cpuacct type cgroup (rw,nosuid,nodev,noexec,relatime,cpu,cpuacct)
systemd-1 on /proc/sys/fs/binfmt_misc type autofs (rw,relatime,fd=35,pgrp=1,timeout=0,minproto=5,maxproto=5,direct,pipe_ino=19071)
mqueue on /dev/mqueue type mqueue (rw,relatime)
debugfs on /sys/kernel/debug type debugfs (rw,relatime)
hugetlbfs on /dev/hugepages type hugetlbfs (rw,relatime,pagesize=2M)
configfs on /sys/kernel/config type configfs (rw,relatime)
fusectl on /sys/fs/fuse/connections type fusectl (rw,relatime)
tmpfs on /tmp type tmpfs (rw,nosuid,nodev,relatime)
tmpfs on /run/user/999 type tmpfs (rw,nosuid,nodev,relatime,size=1606932k,mode=700,uid=999,gid=999)
gvfsd-fuse on /run/user/999/gvfs type fuse.gvfsd-fuse (rw,nosuid,nodev,relatime,user_id=999,group_id=999)
/dev/sda2 on /media/ubuntu/M2X NTFS type fuseblk (rw,nosuid,nodev,relatime,user_id=0,group_id=0,default_permissions,allow_other,blksize=4096,uhelper=udisks2)
/var/lib/snapd/snaps/core_6673.snap on /snap/core/6673 type squashfs (ro,nodev,relatime,x-gdu.hide)
/var/lib/snapd/snaps/core18_941.snap on /snap/core18/941 type squashfs (ro,nodev,relatime,x-gdu.hide)
/var/lib/snapd/snaps/gnome-3-28-1804_31.snap on /snap/gnome-3-28-1804/31 type squashfs (ro,nodev,relatime,x-gdu.hide)
/var/lib/snapd/snaps/gnome-calculator_406.snap on /snap/gnome-calculator/406 type squashfs (ro,nodev,relatime,x-gdu.hide)
/var/lib/snapd/snaps/gnome-characters_254.snap on /snap/gnome-characters/254 type squashfs (ro,nodev,relatime,x-gdu.hide)
/var/lib/snapd/snaps/gnome-logs_61.snap on /snap/gnome-logs/61 type squashfs (ro,nodev,relatime,x-gdu.hide)
ubuntu@ubuntu:~$
Make /cdrom writable and install the legacy bootloader:
Install grub2 legacy boot components
ubuntu@ubuntu:~$ sudo su
root@ubuntu:/home/ubuntu# mount -o remount rw /cdrom
root@ubuntu:/home/ubuntu# grub-install --force --no-floppy --boot-directory=/cdrom/boot  /dev/sda
Installing for i386-pc platform.
Installation finished. No error reported.
root@ubuntu:/home/ubuntu#
[Update 2020.11.22] The grub-install default target may be changed to EFI in newer Ubuntu versions. If the above fails with “Installing for x86_64-efi platform.
grub-install: error: cannot find EFI directory.” Add the below to the install command.
--target=i386-pc
Now the “turbo” gadget should boot in either legacy or UEFI mode. The grub menu is shared by both modes. With this live (not installed) setup it’s possible to easily hand-edit grub.cfg to add other bootable tools and options. Editing can be done from Windows or Linux. Directories and files can also be added from Windows (apart from the persistence file – see below).
My current menu is shown below. It includes the “stock” live Ubuntu boot stanzas and the things I’ve added: Ubuntu 16.10 booted from an ISO, 16.10 via ISO with persistence (more on that below), Linux Mint 19.1 from an ISO (per request of someone who uses my “Swiss Army” drives on the job, Acronis, Memtest (legacy and UEFI) and a UEFI shell tool.
Included are examples of directly booting the primary Ubuntu, loop-mounting ISOs and booting them, booting other images, and chainloading.
Current grub.cfg (boot menu)
if loadfont /boot/grub/font.pf2 ; then
	set gfxmode=auto
	insmod efi_gop
	insmod efi_uga
	insmod gfxterm
	terminal_output gfxterm
fi

set menu_color_normal=white/black
set menu_color_highlight=black/light-gray

set timeout=5
menuentry "Try Ubuntu 19.04 without installing" {
	set gfxpayload=keep
	linux	/casper/vmlinuz  file=/cdrom/preseed/ubuntu.seed boot=casper quiet splash ---
	initrd	/casper/initrd
}
menuentry "Try Ubuntu 19.04 without installing (safe graphics)" {
	set gfxpayload=keep
	linux	/casper/vmlinuz  file=/cdrom/preseed/ubuntu.seed boot=casper quiet splash nomodeset ---
	initrd	/casper/initrd
}
menuentry "Install Ubuntu 19.04" {
	set gfxpayload=keep
	linux	/casper/vmlinuz  file=/cdrom/preseed/ubuntu.seed boot=casper only-ubiquity quiet splash ---
	initrd	/casper/initrd
}
menuentry "Install Ubuntu 19.04 (safe graphics)" {
	set gfxpayload=keep
	linux	/casper/vmlinuz  file=/cdrom/preseed/ubuntu.seed boot=casper only-ubiquity quiet splash nomodeset ---
	initrd	/casper/initrd
}

# ### My additions below

# Boot Ubuntu 16.10 from ISO

menuentry "Ubuntu 16.10 64-bit Desktop ISO" {
   set isofile="/bootable/iso/ubuntu-16.10-desktop-amd64.iso"
   loopback loop $isofile
   linux (loop)/casper/vmlinuz.efi boot=casper iso-scan/filename=$isofile noeject noprompt splash --
   initrd (loop)/casper/initrd.lz
}

# Boot Ubuntu 16.10 from ISO With Persistence

menuentry "Ubuntu 16.10 64-bit Desktop ISO With Persistence" {
   set isofile="/bootable/iso/ubuntu-16.10-desktop-amd64.iso"
   loopback loop $isofile
   linux (loop)/casper/vmlinuz.efi boot=casper iso-scan/filename=$isofile persistent persistent-path=/persistence/ubuntu-16.10 noeject noprompt splash --
   initrd (loop)/casper/initrd.lz
}

# Boot Mint 19.1 from ISO

menuentry "Mint 19.1 64-bit Desktop ISO" {
   set isofile="/bootable/iso/linuxmint-19.1-cinnamon-64bit.iso"
   loopback loop $isofile
   linux (loop)/casper/vmlinuz boot=casper iso-scan/filename=$isofile noeject noprompt splash --
   initrd (loop)/casper/initrd.lz
}

menuentry "Acronis 2018 9207 ISO 64 Bit Mode UEFI (NOT SECURE BOOTABLE) and Legacy" {
set quiet=1
set gfxpayload=1024x768x32,1024x768
set mbrcrcs=on
set isofile="/bootable/iso/AcronisTrueImage2018_15470.iso"
search --set -f $isofile
loopback loop $isofile
# edit: lang=13 is asian # linux (loop,msdos1)/dat10.dat lang=13 quiet force_modules=usbhid
linux (loop,msdos1)/dat10.dat quiet force_modules=usbhid
initrd (loop,msdos1)/dat11.dat (loop,msdos1)/dat12.dat
boot
}

menuentry "Memtest 86+ V5.01 legacy boot" {
   linux16 /bootable/images/memtest86+-5.01.bin
}

menuentry "Memtest 7.5 UEFI chainload" {
   chainloader /bootable/memtest86v7.5/EFI/BOOT/BOOTX64.EFI
}

menuentry "EFI Shell UEFI chainload" {
   chainloader /bootable/EFI_Shell/BootX64.efi
}
The current directory and file layout (with most of the live Ubuntu stock files obscured by “…” to reduce clutter) I’ve added the bootable and persistence folders and their contents to the stock Ubuntu setup.
Current folder and file configuration
Folder PATH listing for volume M2X FAT32
Volume serial number is A4DA-E616
D:.
|   md5sum.txt
|   README.diskdefines
|   M2X FAT32 Tree.txt
|
+---persistence
|   \---ubuntu-16.10
|           casper-rw
|
+---EFI
|   \---BOOT
|           BOOTx64.EFI
|           grubx64.efi
|           mmx64.efi
|
+---install
|       mt86plus
|
+---isolinux
|       ...
|
+---pics
|       ...
|
+---pool
|       ...
|
+---preseed
|       ...
|
+---.disk
|       ...
|
+---[BOOT]
|       1-Boot-NoEmul.img
|       2-Boot-NoEmul.img
|
+---boot
|   \---grub
|       |   font.pf2
|       |   grub.cfg
|       |   grubenv
|       |   loopback.cfg
|       |
|       ...
|
+---bootable
|   +---EFI_Shell
|   |       BootX64.efi
|   |
|   +---images
|   |       memtest86+-5.01.bin
|   |
|   +---iso
|   |       AcronisTrueImage2018_15470.iso
|   |       linuxmint-19.1-cinnamon-64bit.iso
|   |       ubuntu-16.10-desktop-amd64.iso
|   |
|   \---memtest86v7.5
|       |   license.rtf
|       |
|       +---EFI
|       |   \---BOOT
|       |       |   blacklist.cfg
|       |       |   BOOTIA32.efi
|       |       |   BOOTX64.efi
|       |       |   MemTest86.log
|       |       |   mt86.png
|       |       |   unifont.bin
|       |       |
|       |       \---Benchmark
|       +---help
|       |       MemTest86_User_Guide_UEFI.pdf
|       |
|       +---src
|       |       memtest86-src.tar.gz
|       |
|       \---syslinux
|               boot.txt
|               isolinux.bin
|               ldlinux.c32
|               memtest
|               syslinux.cfg
|
+---casper
|       ...
|       initrd
|       vmlinuz
|
\---dists
    ...
Persistence:
This is a sore subject as explained below 🙁 Persistence can be very useful when working with live Linux. Since live “installs” revert to their original state when booted, there’s no way to update them or add a useful driver or tool – except for persistence. Generally speaking it’s not really appropriate for updating the entire distro (requires a very large file and really slows things down), but to add something like a newer wifi driver, it’s very useful.
Persistence consistists of a file to contain updated state, and a flag in the boot stanza. See below for an example of persistence file creation, and grub.cfg above for the boot stanza.
NOTE: the name of the persistence file changed with Ubuntu 20.04 from casper-rw to writable.
[Update 2024.02.11] The failure of persistence in later Ubuntu versions noted below seems to be a requirement for a larger perisitence file – even when the changes stored are minor.
What seems to work now is this:
dd if=/dev/zero of=writable bs=1M count=1024
Persistence file creation
ubuntu@ubuntu:~$ sudo su
root@ubuntu:/home/ubuntu# mount -o remount rw /cdrom
root@ubuntu:/home/ubuntu# cd /cdrom
root@ubuntu:/cdrom# mkdir persistence
root@ubuntu:/cdrom# cd persistence
root@ubuntu:/cdrom/persistence# mkdir ubuntu-16.10
root@ubuntu:/cdrom/persistence# cd *ubu*
root@ubuntu:/cdrom/persistence/ubuntu-16.10# dd if=/dev/zero of=casper-rw bs=1M count=128
128+0 records in
128+0 records out
134217728 bytes (134 MB, 128 MiB) copied, 0.0866414 s, 1.5 GB/s
root@ubuntu:/cdrom/persistence/ubuntu-16.10# mkfs.ext3 casper-rw
mke2fs 1.44.6 (5-Mar-2019)
Creating filesystem with 131072 1k blocks and 32768 inodes
Filesystem UUID: fec57b24-47c5-4adc-931a-021c6a38a29a
Superblock backups stored on blocks:
	8193, 24577, 40961, 57345, 73729

Allocating group tables: done
Writing inode tables: done
Creating journal (4096 blocks): done
Writing superblocks and filesystem accounting information: done

root@ubuntu:/cdrom/persistence/ubuntu-16.10#
And now the bad news: persistence is broken from Ubuntu 17.x onward. That’s one of the reasons I’ve included 16.10 in this gadget. Something about snapd causes very high CPU usage when persistence is implemented in later Ubuntu versions. My pleas have fallen on deaf ears 🙁
Live images with broken seed causes snapd high CPU usage and periodic short GUI freezes
[Update 2019.10.31] Ubuntu 19.10 seems to correct the snapd-related bug and persistence is usable again 🙂
[Update 2019.11.09] Unfortunately Ubuntu 19.10 breaks the ability to boot an ISO in UEFI mode, so it isn’t very usable after all 🙁
[Update 2020.05.02] And ISO booting still isn’t fixed in 20.04 🙁
[Update 2020.09.13] persistence and ISO booting:
Persistence didn’t work with Ubuntu 20.04. Just about went up in smoke trying to figure it out. The name of the persistence file has changed from casper-rw to writable.
There’s a work-around that gets loop-mounted ISOs to boot in 20.04. Add rmmod tpm to grub.conf as shown below:
if loadfont /boot/grub/font.pf2 ; then
set gfxmode=auto
insmod efi_gop
insmod efi_uga
insmod gfxterm
terminal_output gfxterm

# try to work around ISO loop boot problem
rmmod tpm
fi
(at last) Speed:
It’s physically somewhat larger than a flash drive, but that – IMNSHO – is offset by the multiple partition capability … and speed.
USB-C:
USB-3.0:
(finally) Quirks:
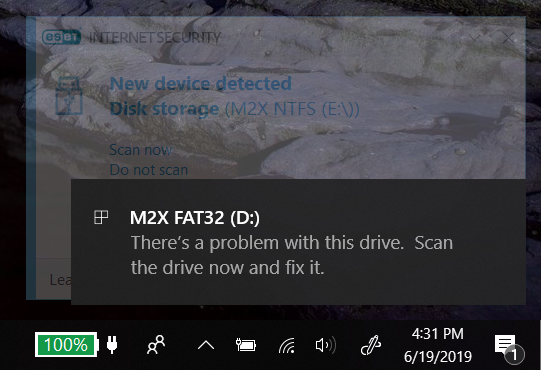
I’ve noticed a couple of issues with this setup. One is MS foolishness, the other seems to be an M2X issue – perhaps harmless.
Microsoft:
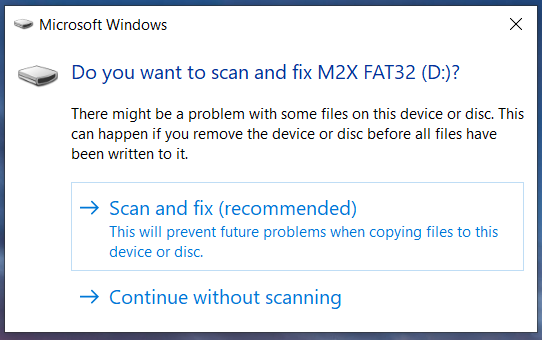
If Ubuntu has been booted on this setup, the next time it’s plugged into a Win 10 machine there will be an error warning. It seems to be a total false alarm, and also happens with all my bootable flash drives.
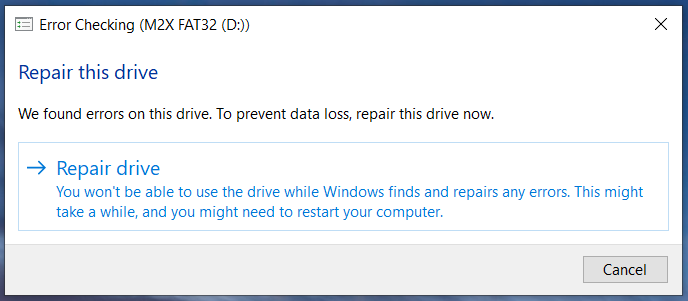

“No errors were found”. But you seemed so certain… I’ve come to just ignore the offer to scan.
M2X:
If the M2X is plugged into an “always on” USB-x port (direct to desktop or laptop, via hub or dock) shutting down Windows causes the activity LED on the adapter to start blinking. Eternally. I’ve let it blink for a couple of hours. Even unplugged the host PC from the dock or hub, and it keeps on blinking.
This can also happen when simply doing a “Safely Remove Hardware and Eject Media” action in the Windows toolbar.
It does not seem to happen when shutting down from Ubuntu. Very odd.
I’ve identified differences in behavior based on the exact revision of the M2X circuit board, but no revision is totally immune in all situations. Current and previous firmware revs don’t seem to make a difference. Since we’re schooled to not unplug or power off an external drive when the activity LED is blinking, this is troubling. So far I’ve not detected any data corruption, but it remains a concern.
I will say that MyDigitalDiscount support has been very responsive, and I’m optimistic that this will get resolved. Perhaps with a firmware update. I’ll report back when I have further news.
Update 2019.09.02: The bad news: my MyDigital contact has gone silent 🙁 The good news: a firmware update appears to have solved the permanently-blinking activity LED issue. Will keep an eye on it…